Polymer Clay Fan

Free Sculpting Tutorials

Search Results

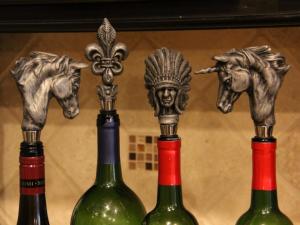
Functional Art – Creating Unique Wine Stoppers

Posted by goregt On November - 26 - 2014

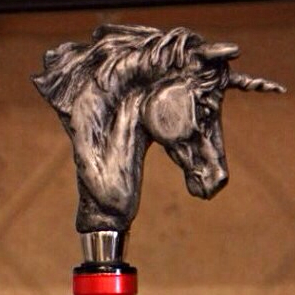
Gore Collection Unicorn Wine StopperOver the past few years I’ve gravitated from creating what I would consider more conceptual to functional based art. I still enjoy sculpting statues and figurines, that will always be a part of me, but I have to admit that creating a unique functional piece of artwork has a strong appeal to me. Not only is the artwork fun to look at, it’s also a great way to create an engaging conversation piece.

I started my functi0nal art journey a few years back making cigar related tools and as of late have spent a great number of hours creating art for the wine enthusiast. What’s intriguing about creating this type of art it that it really stimiluates my own creativity. I look at the world with a different view in that any and every item I interact with has an opportunity to also because an artistic centerpiece. Napkin holders, coasters, light switches, etc and etc offer endless opportunities to create something that is functional yet an attraction for its design and beauty.

If you have never created a functional piece of art then I highly recommend you give it a try. Push yourself with the design, make the challenge something that you have to give your very best effort. In the end no matter what you make, or how the design ends up, I truley believe you will grow as an artist. After all I’ve never grown much from my easy projects, it’s the ones I wanted to throw in the trash that really developed my skills. For me sculpting wine stoppers pushes the envelops of my creativity. I have to sculpt smaller than I prefer and on top of that I’m tasked with trying to create an appealing design that will rest on top of a wine bottle.

Go out and find your niche and try something new. Struggle with the project, push yourself, don’t give up and in the end I’m confident you will be a better artist for it.

If you would like to check out my latest endeavors you can view them at my

Etsy shop – www.etsy.com/shop/gorecollection or my website – www.gorecollection.com.

Bottle Stoppers

All the best,

Gerald Gore


Great Classroom Projects With Free Art Lesson Plans

Posted by goregt On October - 3 - 2009

We know how difficult it is to come up with new and yet inexpensive ideas for classroom art projects. Our staff is always on the alert for great new ideas (if you have any, let us know! We are always adding to our library of free downloadable lesson plans). Our art lesson plans are either in PDF format or PowerPoint presentations, and they can be downloaded absolutely free. For elementary school students there are easy-to-follow explanations of lithography; portrait sculpture in clay; dinosaur bone clay relief sculpture; polymer clay bead making; prehistoric cave art; and even making clay skulls to celebrate Mexico’s Day of the Dead. For high school students there are more advanced art projects such as multi-color printing; sculpting insects with polymer clay; relief sculpture; making reproductions of Chinese vessels in bronze; sculpting life sized heads and ceramic self-portraits. There is also an Introduction to Glass in the Classroom; making fused and slumped warm glass objects d’art; glass casting; and glass jewelry making. Read the rest of this entry »

Polymer Clay Art

Posted by goregt On August - 5 - 2009

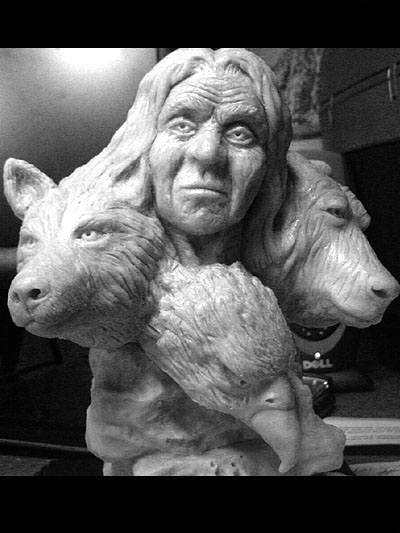
Polymer clay is a very versatile and wonderful medium to work with. Whether your polymer clay art interest is jewelry, wildlife art, dolls, figurines or other polymer clay projects, there are no limitations to the quality of work that you can do. Listed below are examples of a few sculptures created in Polymer Clay.

Polymer clay art of a warrior angel

Polymer clay angel

Polymer clay wildlife sculpture

Polymerclay Indian sculpture Read the rest of this entry »

Evaluating Your Art

Posted by goregt On April - 13 - 2007

A few simple tips and tricks to help you evaluate your artwork

I’m a firm believer that when sculpting you should from time to time step back and take a different look at your art. If you stare at the same thing for too long of a period of time, it can become easy to overlook minor and sometimes major mistakes within your artwork. There are several different tools or methods that I use to evaluate my art when I am sculpting.

Read the rest of this entry »

Dental Tools

Posted by goregt On March - 18 - 2007

Using Dental Tools for Sculpting

When I first started sculpting with Super Sculpey I went out and purchased a little $5 set of plastic sculpting tools at my local Hobby Lobby. These tools were great for the time and I used them consistently for about a year and half to two years. However, as my skills improved I started to realize the limitations of my starter set of sculpting tools.

Now I had heard through the grapevine that dental tools were great for sculpting. They come in a variety of sizes and shapes and best of all are made of metal. I first started by asking my local dentist if they had any old tools that they were disposing of. After a few crazy looks it was clear that I should just break down and go out and buy a set of my own. To my surprise I found a set of 18 dental tools on Amazon.com for a price around $25. I was skeptical at first but thought for that low amount of money it was worth taking the risk.

Read the rest of this entry »

Facebook Fan Page

Posted by goregt On November - 30 - 2011

For those of you out there that enjoy cigars, or know someone else that enjoys cigars, we are holding a Facebook contest where you could win one 0f the GoreArtistry cigar tools or ashtrays for free.  The contest rules are as follows.

One lucky winner will win any one item of their choice (set of nubber & draw tool, or an ashtray) from the cigar tool line up (all items can be viewed at www.GoreArtistry.com).

The way this contest will work is as follows:
– Once there are 200 likes on the GoreArtistry Cigar Tools Facebook fan page I will place paper numbers from 1 to 200 in a bucket and draw one number at random.
– Which ever number is drawn the person with the same like number will win. Example say you were the 50th person to like the fan page and the number 50 is drawn then you will be the winner. I am setting the contest up this way so the people that have already liked the page will have a chance to win also.

– The link for the fan page is: http://www.facebook.com/pages/GoreArtistry-Cigar-Tools/171704929580799

Tribal Back – 1

Posted by goregt On September - 30 - 2009

Sculpting a back can be a little tricky and I’ve always found it to be a bit challenging as well. There are a lot of different muscles and bones that make up the back and more importantly the shapes they create come and go into all different directions. Now sculpting a back with more body fat on it would decrease the difficulty but I prefer designs of a leaner physique. However, the key with this sculpture is to not go too lean on the back because it will not flow well with the rest of the design.

I have already sculpted a rough shape of the back when I blocked out the torso. Now I need to tie the individual muscles together while trying to make it look natural. Using a sharp sculpting tool I like to draw out some of the individual shapes. Basically I’m trying to break out the scapula, traps and lower lats into different basic shapes. Once this stage has been completed I will build out the individual forms. Read the rest of this entry »

Blending in the Scars

Posted by goregt On September - 29 - 2009

OK, for this lesson I will briefly cover the steps for blending the small round scars. I like to first layout my design before blending the shapes into the rest of the sculpture. The reason why is because if my spacing is off or I don’t like the way the design is taking shape I can easily make changes. Otherwise I would have to scrape away clay, smooth out the belly and start over.

Once I have everything where I want I just take a flat edge sculpting tool and blend the edges of my small ball shaped scars. The key is to make sure you blend all of the edges. To accomplish this I like to look at the sculpture from all kinds of angles. It is amazing how a sculpture changes when you look at it from a different angles, everything may like fine from one end while when you look at it from the other end all kinds of mistakes or imperfections appear. The same point holds true when painting a sculpture but that is another tutorial in itself. Read the rest of this entry »

Sculpting the Belly Button

Posted by goregt On September - 21 - 2009

In this next tutorial I will walk you through the steps for sculpting a belly button. Belly buttons are actually made up of interesting shapes and there really is a lot more to sculpting them then just creating a hole inserted into the clay. Now belly buttons come in all types of shapes and designs but there are some traits that are common in most belly buttons. For instance there are small folds of skin in and around the belly button. Also, if you look closely the design and shape of the stomach also changes around belly buttons as well.

Because belly buttons come in all kinds of shapes and sizes there are many different types of belly buttons that you can sculpt. Keep in mind that this tutorial is just one example of how a belly button can look. So use this tutorial as one option for sculpting a belly button and see what designs you can come up with. Read the rest of this entry »

Calipers

Posted by goregt On September - 18 - 2009
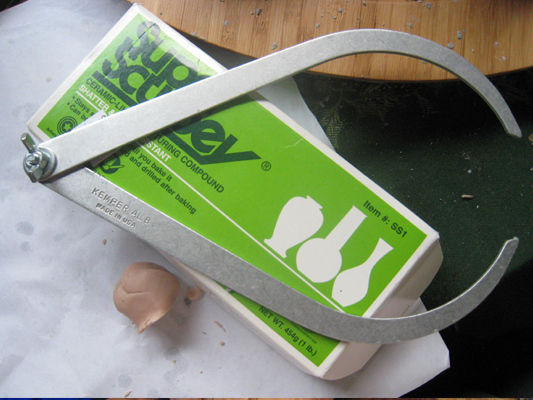
Caliper

Caliper

If you ever plan to sculpt anything that is symmetrical in design then a caliper is a must. Calipers are an important sculpting tool because they help you accurately measure of length, width and distance of the different pieces that make up a sculpture. There may be some sculptors out there that can accurately sculpt a symmetrical design by sight alone but for us mere mortals the caliper is a must have tool.

If you have been sculpting for some time and do not own a caliper, there is a very strong chance that at one time or another you still have used a very crude and basic caliper tool. What I’m talking about is your thumb and index finger. Have you ever sculpted an arm on one side of the body and use your thumb and index finger to measure the length so that you could accurately match it to the arm on the other side of the body? How about when you sculpt a face or a torse, are you like me and draw a center line seperating the object into two? Did you ever use a string, a ruler or your fingers to check that both halves of the face or torso were even in both the width, length and thickness?

If you answered yes to any of these questions then you have turned your thumb and index finger into a very crude caliper. The problem with the “homemade” version of caliper is that it doesn’t always provide the most accurate results. A professional caliper eliminates the guessing game and gives the artist the ability to take measurements with ease.  Unlike some of the other tools that are required for sculpting, this is really only a onetime investment.  You wont use it all the time but it is a real gem in those situations when an accurate measurement is needed. Read the rest of this entry »

VIDEO

Enter the video embed code here. Remember to change the size to 320 x 270 in the embed code.

TAG CLOUD

Recommended Sites

About Me

Nothing special, just a self-taught sculptor having fun with my art and showing all of you the tips and tricks I use to create my own artwork

Twitter

    Photos

    Activate the Flickrss plugin to see the image thumbnails!